Although the preparation of Platelet-Rich-Plasma (PRP) is not a complicated process, there are several critical steps that must be followed. In addition to the published IFU protocols there are some optional techniques that we will further elaborate on in this post. Specifically, we will be going over the preparation and concentration protocols for an EmCyte 30cc Pure PRP kit. If you have any questions or would like to schedule a demonstration, please don’t hesitate to contact us. You may also visit our product page to purchase EmCyte PRP
Please Note
This post does not take the place of the official Instructions for Use (IFU), please reference that document when processing.
EmCyte Pure PRP devices are single use only – discard after use
The PurePRP GenesisCS Component Concentrating System is manufactured by EmCyte Corporation. The kit prepares platelet rich plasma from a small sample of blood at the point of care. The system contains syringes, needles and the concentrating device accessories. (see previous post for list of contents)
The process is broken down into two parts. Part 1 is referred to as the Preparation Protocol and Part 2 is referred to as the Concentration Protocol.
Preparation Protocol
Always swab self-sealing ports with sterile alcohol prior to accessing with a sterile syringe.
Step 1.
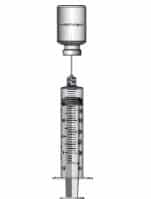
Using the filtered needle, draw 3mL of anticoagulant into a 30mL syringe. Both the syringe and anticoagulant are provided in the kit. There is no need to retain the vial of anticoagulant for future procedures.
Step 2.
Using the provided butterfly needle, draw 27mL whole blood from the patient, filing the syringe to 30mL. An additional technique: once you have filled the syringe with the whole blood it is good practice to rock it a few times to allow the anticoagulant to homogenize. You are also provided with sterile syringe caps. Once complete remove the butterfly syringe and cap the syringe if not immediately processing.
Concentration Protocol
Step 1.
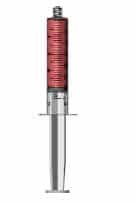
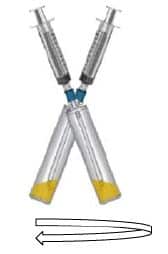
Load anticoagulated whole blood into the concentrating device. The Pure PRP kits come with two concentrating devices, for spin one and spin two. You can identify the first spin tube several different ways, however, the easiest way is to look for the concentrating device with the red cap. The concentrating device is vented so don’t worry about passing air from the syringe into the device.
Step 2.
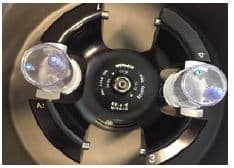
Place the first spin concentrating device into the centrifuge. Place the water-filled counterbalance directly opposite the blood-filled device. Note: a scale is provided with the centrifuge to ensure an appropriately weighted counterbalance. For the platinum centrifuge select PurePRP SP Spin 1.
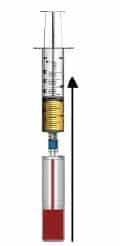
Step 3.
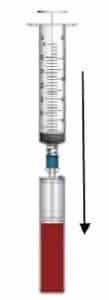
Using a new (provided in kit) 30mL syringe, aspirate the Platelet Plasma Suspension (PPS) until RBC fill into the aspirating pipe (clear plastic tube within the device itself). It is normal to aspirate small amounts of RBC into the syringe during this process; however, should you want a purely amber PRP take extra care not to pull RBCs into the syringe.
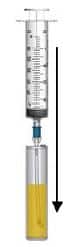
Step 4.
Transfer the PPS into the second concentrating accessory. Again, the device is vented so air from the syringe can safely pass into the device.
Step 5.
Place the concentrating device with the PPS into the centrifuge and counterbalance the opposite side. Set the Platinum centrifuge to PurePRP SP Spin 2.
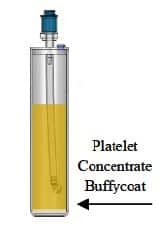
Step 6.
Remove the concentrating device from the centrifuge. You will notice that the Platelet concentrate buffy coat has separated out at the bottom of the concentrating device.
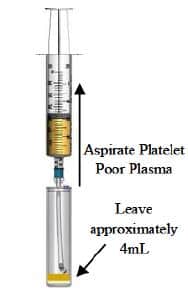
Step 7.
Aspirate the Platelet Poor Plasma (PPP) from the concentrating device. Leave 4-6mL of plasma behind to resuspend the buffy coat into during the next step.
Step 8.
Attach the 12mL syringe (provided in kit) and gently swirl to resuspend the platelet buffy coat into the plasma. Keep in mind that platelets in the buffy coat are plastic adherent and will take a small amount of effort to suspend into the plasma.
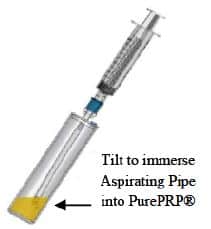
Step 9.
Title to immerse the aspirating pipe into the Pure PRP device. You’ll notice that the aspirating pipe does not go all the way to the bottom, it has a 90-degree bend at the bottom, which requires tilting the device to fully aspirate the PRP.
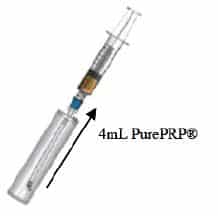
Step 10.
Extract the Pure PRP into the 12mL syringe.
In Conclusion
AS you can see the process itself is not complicated. When preparing EmCyte PRP follow the official IFU provided by the EmCyte Corporation. This IFU can be accessed by scanning the QR code on the front of the PRP kit. You can also visit EmCyte to view their materials. Please contact us if you have any questions.